|
|

|
Engine/transmission management partsSensor oil pressure Kit, (emulator microprocessor) replacement for original vehicle | 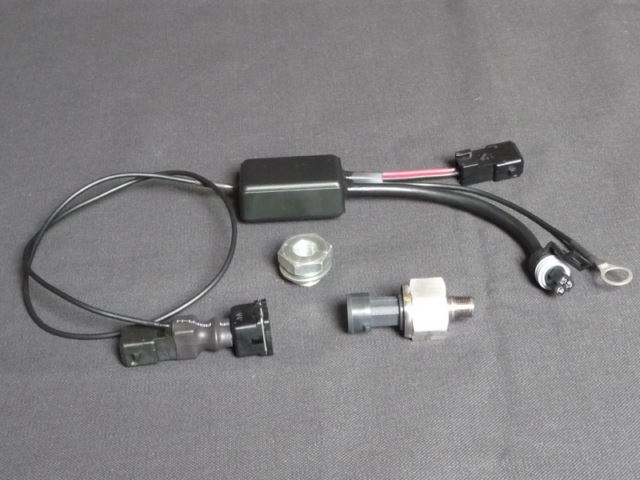
Kit of replacement of the sensor of original oil, for original vehicle.
Installs on the connection of origin without changes.
As a reminder, the original XU10J4TE sensor has two channels:
- a way to alert low oil pressure, triggered below 1.5 bar (display STOP)
- a way to the pressure display to the dashboard (0-8 bars)
This kit replaces functionally the same as the original sensor (NFP Peugeot).
Calibration and its ability to measure make a product that is generally more accurate than the original sensor.
This kit requires to be fed through a recovery connector 12V (couple male-female two way) on the beam to origin at the level of the canister solenoid (+ 12 V contact), and a 10 mm for the mass Terminal.
So, no electric consumption is cut off contact.
This kit is made:
New: adapter NYLON (to reduce constraints thermal, vibration and pressure on the electronic sensor)
- of an electronic pressure sensor 10 bars and its thread adapter,.
- of a box to microprocessor,.
- of a bundle of connectors:
* record three tracks for the electronic sensor
* mass for threads M10 (socket on the nut M10 of the support plug sensor rattling, just in the vicinity)
* recovery of 12V power supply (two channels a wire) on the canister solenoid (located at the base of the radiator)
* two way connector male two wires to the engine beam to origin of the sensor
Some installation tips:
- remove the air - water heat exchanger and the backing plate
- remove the original using a 40 mm long socket sensor; If the ring plastic 40 mm slides under the torque, break and remove this ring; use a wrench to fork amended 21 mm, and thin (approx. 8 mm) to loosen the sensor. More radical, use a key to claw directly on the body of the sensor.
- install the entire sensor + adapter on the motor unit (see note below)
- place the housing of the emulator under the air dispatcher
- remove the nut M10 of the flange of the plug peacekeeping sensor rattling (green plug); install the pod 10 mm of the mass of the emulator; tighten the nut with a low torque (no mechanical function)
- Insert the three-way plug in the sensor
- Insert the two plug to see two sons in the origin of the sensor cable plug
- get the cable from resumption of power under the dispatcher to the canister solenoid. connect the beam in derivation between the solenoid and its cable; Clamp the plastic wire with necklaces
- fix the housing to the beam to origin with a plastic collar
- test the switching contact (the needle should display 0 bar and the STOP light should be lit) and the engine start (can display up to 7-8 bar, depending on the room temperature and the viscosity grade of oil)
- replace the plate support and the exchanger
Note for the installation of the NYLON adapter on the motor
Caution: maximum torque 10 Nm (1 daNm)
Locking and sealing must be carried out with a suitable product, and not by excessive tightening.
Use a sealant and brake net adapted; the product must bear the presence of hot oil.
In case of excessive clamping and/or crack or noticeable game, must replace the adapter nylon (available in this topic).
Photography: Not contractual; changes in the kit are possible improvements.
|
|
|
|
|
|